This feature works for:
Account: All accounts
Plan subscribed: All plans
Before you begin:
Things to take note:
- You might need an introduction to bantu Workspace Dashboard for either Main Organiser or Sub-Organiser, and understand the difference between 'Account' and 'Organisation'
- This tab brings you to your account page, which contains an overview of all contacts in the projects you are in charge of, and other tools for more efficient project management
Instructions:
First, on the bantu Workspace Dashboard, click on the 'Manage My Account' tab.

There are 2 sub-tabs: 'All My Members' and 'Duplicate Project', as seen below:

Sub-Tab 1 - All My Members
This sub-tab contains the master table of contacts, which are in the projects that belong to your account. Contacts in projects that belong to other accounts would not be shown here.
Section 1 - Main Statistics
There are 2 main statistics: 'Total People' and 'Total Hours Tracked', as seen below:

1. Total People
- This shows the total number of unique contacts in the projects in your account
Note: There is no double counting — if Contact A is in 2 projects, it is counted as 1 person.
2. Total Hours Tracked
- This shows the total number of hours served by contacts to the projects in your account
Section 2 - Tools to Manage Contacts
There are some tools to help you manage these contacts.

1. Add Person
- Clicking this enables you to manually add an individual contact into your Account, without having to assign them any projects
> See this guide on adding people manually into your Account
Note: This contact will not show up in another account under your Organisation.
Note: You can use the “assign project(s)” tool to slot the contact into a project later.
2. Import Contacts
- Clicking this enables you to import contacts from an excel sheet into your account, without having to assign them any projects
- Download the Sample Import Template to see what data you can import and their formats
- You can change the overwriting options for existing users in your database
> See this guide on importing contact data and changing the overwriting options
3. Export Contacts
- Clicking this enables you to export the master table of contacts into an excel sheet that would be automatically downloaded for you
- If you only want to export a part of your contacts, you can use the filter function to filter the contacts by a certain field before export them — If you only want the male contacts, you can filter the contacts by gender before exporting them
> See this guide on exporting contact data
4. Mass Remove
- You can click on this once you have selected at least 2 contacts by clicking the boxes next to the participants' names
- You may wish to select contacts based on a set of filters
- You may wish to select contacts based on a set of filters
- Clicking this enables you to remove all selected contacts under all projects in your account
> See this guide on removing contacts
Note: This does not remove contacts that are under projects in other accounts — If Contact A is in a project managed by the Main Organiser and also in a project managed by the Sub-Organiser, when the Sub-Organiser removes Contact A from his/her account, it is not removed from the Main Organiser's account.
Important: If the selected contacts only exist in your account, removing this contact will remove his/her data from the entire Organisation — This contact will be removed from the master table in the 'Manage My Organisation' tab.
5. Assign Project(s)
- Clicking this enables you to assign selected contacts from the master table directly to a project
> See this guide on assigning contacts to a project
Note: You can only assign contacts to projects in your account.

6. Engage
- Clicking this enables you to send out ad-hoc emails and SMSes, using pre-defined custom email templates or by crafting quick emails or SMSes for your contacts
> See this guide on sending out ad-hoc emails and SMSes
Section 3 - Tools to Analyse Contacts
There are some tools to help analyse the data of your contacts.
1. Customise
> See this guide on customising the master table of contacts

- This enables you to select the fields that you wish to view for contacts in the master table
2. Filter
> See this guide on filtering contact data

- This enables you to select one of the fields that you wish to filter contacts by in the master table
Note: This list of fields come from the fields you select to show in the master table in 'Customise'.
3. Action - View, Edit and Remove
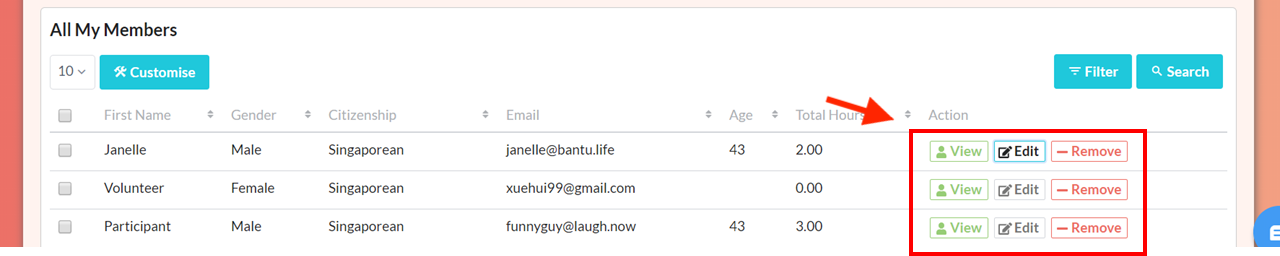
- 'View': This shows the personal details and attendance rates of that contact across all projects you are in charge of
- 'Edit': This enables you to change personal details of that contact if he/she has not created a Community Portal account
- 'Remove': This enables you to delete that contact in your account
Tip: You can see 'Total Projects' for each contact, which adds up the number of projects a contact is involved in, and 'Total hours', which adds up the number of hours clocked by a contact.
Sub-Tab 2 - Duplicate Project
This sub-tab enables you to duplicate an existing project in your account. This could save you a lot of time in creating projects that are similar to the existing ones.

Note: This also duplicates the timeslots that the contacts are assigned to.
Note: Any email and SMS templates edited in the selected project will also be duplicated
What’s Next?
If you are the Main Organiser, you can proceed for a tour of 'Manage my Organisation'.
If you are a Sub-Organiser, go ahead and create a new project.
> Learn how to ensure a successful SMS delivery
> Learn how to send a test email to yourself
> Learn how to add Sub-Organiser(s) to your Organisation